A few people have asked me how I make my school themed ornaments. In fact, my daughter, who will there after be known as "the nag" has been after me to write a DIY blog post about making them.
So I got the message ( also I am tired of the nagging) and below is a how you do them, with lots of pix.
The process is :
- design the ornament- color scheme, images, fabric for panels and ribbon to cover the cut lines, etc
- create the images and iron-ons
- assemble the ornament
- attach the hanger - in this case, I used chain.
Supplies needed :
- smooth foam 3 in diameter balls (no not use Styrofoam- use the smooth type)
- knife - I used a small thin bladed serrated kitchen knife
- thin rubber band
- ribbons - colors of the school
- medium headpins
- scissors
- pencil or pen
- chain - I used wide link cable
- fabric - in the colors of the school. See note on pix on fabric selection.
- measuring tape and ruler
- iron-on transfer paper for light color fabric - Use your printer software to create an inverse of the name, mascot, or what ever you want to create the iron on. I like the quality of the Avery brand and use an HP photosmart printer. Make sure you follow all the instructions for creating the iron-on given by the manufacturer. I always do a test print first for size and color.
- ink jet printer
- coffee cup
- fabric glue
- wax paper
- stiff bristled paint brush
- pliers or jewelry tools.
Let's begin - Pix start below
Draw the lines on the ball and cut -
Take your ball and find the center seam line
Put the rubber band perpendicular to the seam line and put a few pins in it all around the ball. The pins hold the rubber band in place.
Trace a line along the rubber band. I used a pencil and pressed in a little as I circled the ball.
Remove the rubber band and pins and take your knife and cut a line on the drawn line. I usually pierce straight down and not use a sawing motion, because the foam will break apart too much and it will be a mess. Go down about 1/8 in. Then cut and pierce the ball seam line, the same way.
Above is how it appears after you have cut the ball. It has four sections of about equal size.
Iron-ons and Fabric. Measure one of the 4 sections, to get the size and create your transfer. See above note in the supply section about creating you transfers. Cut 4 pieces. I find that using a smooth, white, synthetic fabric works best to "pop" your image or words. Do not get the thickest material because it is harder to work with.
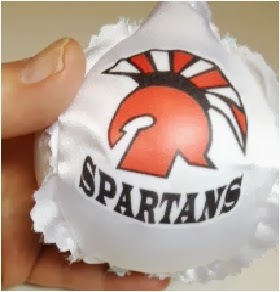
The school mascot is a Spartan and I designed the image myself. I cut one white piece for the school mascot and one piece for the school letters.
Also, when you iron on the transfer, place the image a little to the top of the fabric section. When you do this, this shows the image better when it is placed on the ball, due to the curve of the ball.
The colors for this school are red and white, so I chose a red confetti dot fabric as the other 2 pieces. . Usually the more sparkly the materials for the off-set panels work best.
Put the fabric on the ball -
Find the best of the 4 sections on the ball to place your main image panel. I find the one without the seam center hole works best. Center the fabric panel on that section. I am right handed and I hold the fabric in place with my left hand against the ball and the knife in my right hand.
Use your knife to push the panel edges into the lines you have cut into the ball.
To center this piece, takes a bit of working and time. You may have to realign the fabric a few times. Take your time and go entirely around panel the edges.
I usually cut the fabric panel a little bigger than the section and then once its' edges are pushed into the ridges, I cut the excess off. I then continue to push the edges all the way into the cut lines. When you push the fabric into the ball's cut lines, it secures the fabric to the ball. Thence the "no sew" part of the post title. As it goes in, the fabric is drawn tight and smooths out.
Above is another pix of how to push the fabric into the edges.
The above is how the fabric piece looks after I have completed pushing the edges of it into the cut lines on the ball.
Turn your ball to another section. I place the other white panel directly opposite of the school mascot, making sure the words or image is upright. Center the fabric on this section and repeat the above to secure it.
The above is how the 2nd panel looks after secured.
Now take your fabric pieces and complete the other 2 sections. Because the confetti dot is thin and without images or text, it goes in very fast. But note, this fabric can be easily pierced and cut if you pull or stretch it too hard. Go pretty easy on the pressure of pushing it into the ball cut lines.
Again, cut off any excess material after you have pushed the fabric edges well into the cut lines.
The above is the bottom view of what the ornament looks like when completed.
The above is what the front of the ornament when the fabric panels are secured.
Cover the Seams -
I cut 2 pieces of ribbon.
The ribbon is used to cover cut lines on the ball. That's where the panels meet.
I usually just wrap the ribbon on the ball 1/2 the way around and cut to measure for the first piece. And then I cut the 2nd piece of ribbon to the length of the first. You can also cut four pieces of ribbon, but this will take more time when you glue.
Glue the ribbon. Place a piece of wax paper on your working surface to protect it. Place the ribbon wrong-side facing up on the paper.
Use your paint brush to "paint" the a solid line of fabric glue on the ribbon, covering from edge to edge. Select the type of fabric glue that dries clear.
Run a line of glue along the ball edges that are to be covered. Turn the ribbon over and place it on the fabric panel edges (seams) to cover the cut edges.
I pin the first ribbon to the ornament to anchor it and then repeat the gluing for the second piece of ribbon. Once all the ribbon is glued over the cut-lines seams, then I pin the ribbon to make sure it dries tightly to the ball.
The above is the front of the ornament with ribbons glued over the seams and secured with pins.
The above is the back view of the ornament.
I place the ornament in the coffee cup and let the glue dry overnight or for at least 5 hours.
Attach the hanger . Measure the chain to 9 1/2 inches. To cut, just open a link, do not cut the link. Select 2 head pins that have colors that coordinate with your ornament.
After the ribbon glue has dried, remove the anchor pins. Cut off any
excess ribbon on the top of the ornament.
Place the ornament in the
coffee cup with the front facing away from you. Take the chain and one
headpin. Lay the chain with one edge at the back of the top of the
ball. The rest of the chain is hanging away from you on the ornament's
front, and over the top . Place it at where the ribbons cross and right in the center.
Hold the chain's back edge (the one that is facing you) and measure a few links forward to the front of the ornament. Place the headpin in that link and push it into the ornament. You can tap it in using your scissors, pliers or what ever.
To complete, take the chain and bring it to the back of the top of the ornament. Push the 2nd headpin through the last link of the hanging chain and then place it in the last link of the chain laying on the back of the top of the ornament. It looks likes a circle now. Tap the headpin into the ornament to secure.
Above is how the ornament looks with the chain attached.
This year I've used chain as the hanger, but you can also use ribbon- the same color as the edge ribbon or co-originated.
Use the same process for placement . Then place the ornament in the coffee cup as described above.
However, before you lay the ribbon, use hot glue on a low setting to bead a line on the top of the ornament. Place your ribbon on the glue. Place your 1st head pin and tap it in. Bring the ribbon around to the back and place your 2nd headpin and tap in. The headpins make the ribbon hanger, hang correctly.
That's it! I've made hundred's of these over the years.




 Posts
Posts


